Setup Guide
Step-by-step guide to set up and run Roblox Dumper
Setup Guide
Getting started with Roblox Dumper is very simple.
Prerequisites
- Roblox Dumper downloaded from releases / built from source
- Cloudflare tunnel (included in the release)
Step-by-Step Setup
1. Join the Dumper Game
Navigate to the Roblox Dumper game and join it:
https://www.roblox.com/games/6923982205/Dumper-v2
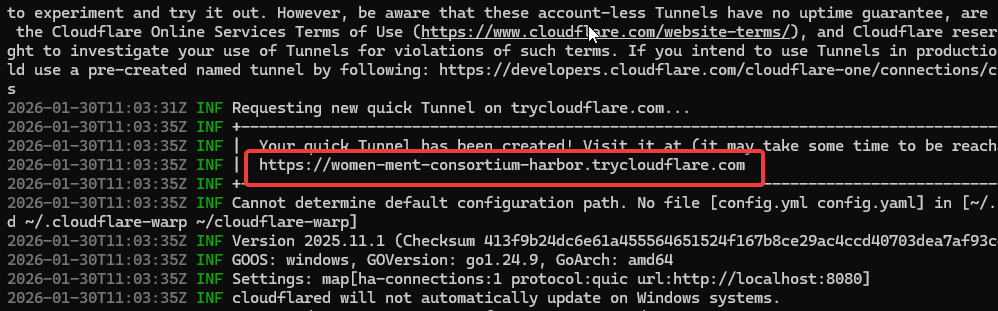
2. Start Cloudflare Tunnel
Run the cloudflare_tunnel.bat file included in your download. This will start a local tunnel for communication between the game and the dumper.
3. Copy the Tunnel URL
Once the tunnel starts, you'll see a URL displayed in the terminal window. Copy this URL - you'll need it for the next step.
4. Run the Dumper
Execute the Roblox Dumper application. When prompted, paste the tunnel URL you copied in the previous step.
5. Generate Offsets
The dumper will automatically:
- Connect to the running Roblox process
- Scan memory for class and property offsets
- Generate offset files in all supported formats (C++, Python, C#, JSON)
Output Files
After completion, you'll find the following files in your output directory:
offsets.h- C++ header fileoffsets.py- Python fileoffsets.cs- C# fileoffsets.json- JSON file
Troubleshooting
Tunnel Connection Issues
- Ensure the tunnel is running before starting the dumper
- Make sure you copied the complete URL including
https:// - Check your firewall settings aren't blocking the connection
Roblox Not Detected
- Verify Roblox is running and you're in the Dumper v2 game
- Try running the dumper as administrator
- Ensure no antivirus is blocking the dumper
Need Help?
If you encounter issues during setup, reach out on Discord: jonahw / 315412038455132160